No wifi network? No problem—the Soil Cell calls in soil moisture data to the web using a cellular network.

The Soil Cell is a web-connected environmental sensor unit used to monitor soil moisture levels. It uses a low-cost Arduino microcontroller and the 2G cellular network to transmit data to a website or server of your choice. (In this tutorial, we will view the data on the free cloud service Ubidots.) The Soil Cell is buried underground and sends data at whatever interval suits your needs. Here, we’ll be sending data every two hours and plotting the results online. In addition, we’ll set a “needs watering” threshold—when the soil becomes too dry, you’ll be notified by email that your plant or garden requires watering.
This is a modular design. Swap out one or both of the soil moisture sensors and measure temperature, humidity, light level, air quality, or water level. In addition to two soil moisture measurements, we’re going to keep track of the device’s battery level and the strength of the cellular network signal.
You need a cellular signal in your area for this to work. We are currently using a 2G SIM card, but a 3G upgrade is imminent. If you live in an area with no cellular network access, consider building a datalogger.
Update: In monitoring locations where the Soil Cell is safe to be placed aboveground, we have added a solar panel and charging battery (such as this one) to power the Arduino.
Materials
 |
 |
 |
Below are the materials you will need to build your Soil Cell. Many of the product links refer you to Amazon or Adafruit, an online electronics retailer. We do not endorse any specific retailer; feel free to shop around online for the best prices. Shipping costs not included below.
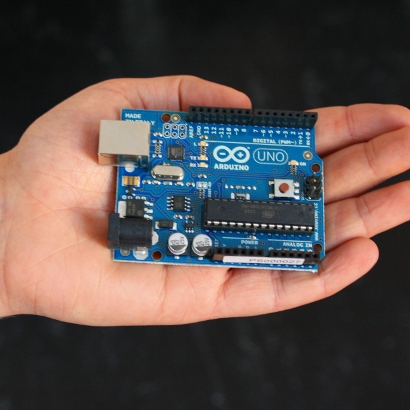
Arduino Uno: $25
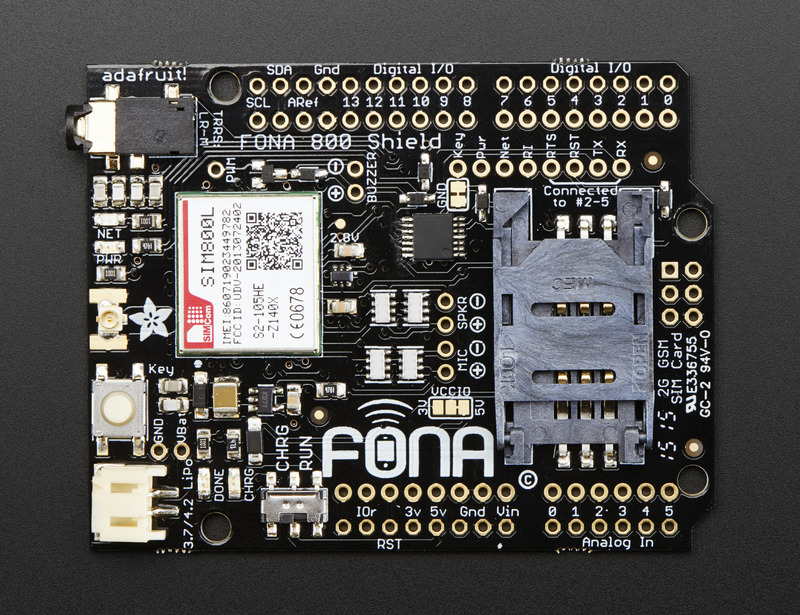
FONA 800 Cellular Shield: $40
2G SIM card: $9
Antenna: $3
LiPo Battery: $12
A/B USB cable: $3
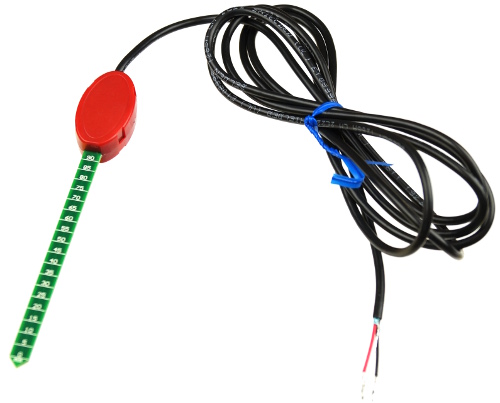
Vegetronix VH400 soil moisture sensors (2): $38 each
Pelican waterproof case: $25
PG7 cable glands: $5
Silicone caulk: $3 at home improvement store
Dessicant packs: $5 for pack of 20 at home improvement store
You will also need a computer, a drill and a shovel.
Total Cost: ~$200
Upload the Code
Register for a free account at ubidots.com. Ubidots is a cloud service where the data will be sent and stored. Once you are registered, go to the Settings tab and create a short token. Next, create a new data source under the Sources tab. Select “Arduino” as the type of source and give it a name: The source is your Soil Cell device; call it Soil Cell or Garden Monitor or Fred and add a description if you like.
Now that you have a Source, create four variables (click on “Add Variable” under Sources); call them Soil Moisture 1, Soil Moisture 2, Battery Level, and Network Strength. When you click on each variable, you’ll notice each has a unique ID in the left-hand sidebar.
We will use Codebender to upload the code to the Arduino. The code is here (it is also below). Change 5 lines in the code: On line 20, put in the token you created at Ubidots. On lines 21-24, type in the four variable IDs from Ubidots. Connect your Arduino to your USB port on your computer, and click the “Run on Arduino” button.
Note: Beginning at line 109, volumetric water content (VWC) is calculated for each sensor. This calculation is based on a calibration and resulting equation that is specific to your sensor and soil type. See links at the bottom of this page for one suggested procedure to calibrate dielectric soil moisture sensors.
Alternatively, you can download and install the free Arduino software if you wish. Note that the code uses two non-standard libraries, LowPower and Adafruit_FONA.
Assemble and Deploy
Activate your SIM card at ting.com. Put the SIM card in the slot on your FONA shield. Stack the FONA shield on top of the Arduino, and attach the antenna and battery as shown below.
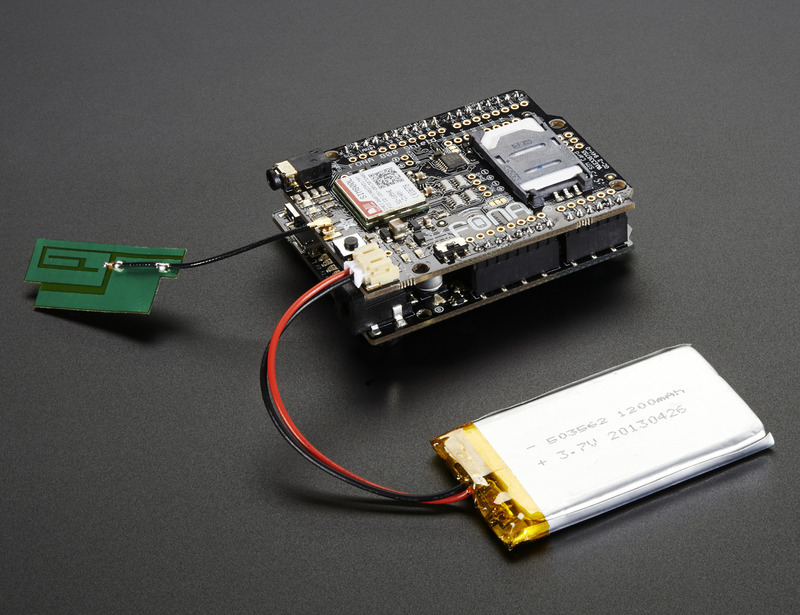 Photo: Adafruit
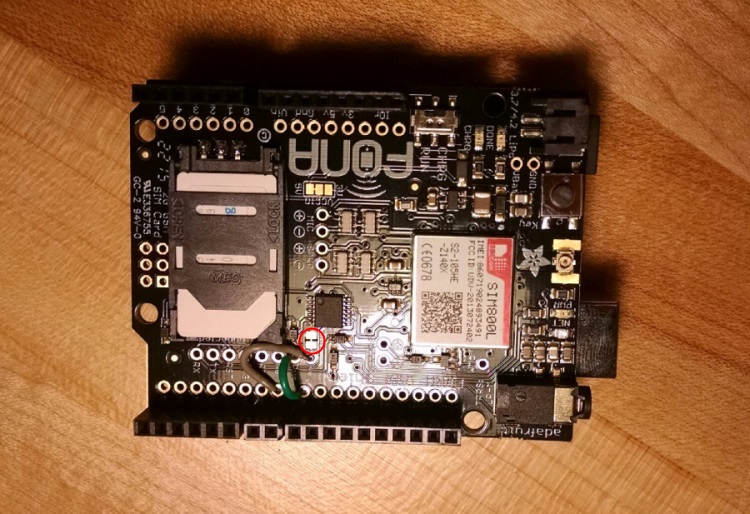
In order to have the Arduino turn the FONA module on and off, we need to make some quick modifications to the FONA shield. Solder a jumper wire from Key to digital pin 7 (see grey jumper wire in the photo below) and a jumper wire from Pwr to digital pin 8 (see green jumper wire in the photo below). Finally, cut the connection between the GND pad directly above Key, circled in red in the photo below (we used an X-acto knife to sever the small strip between the two rectangular pads).
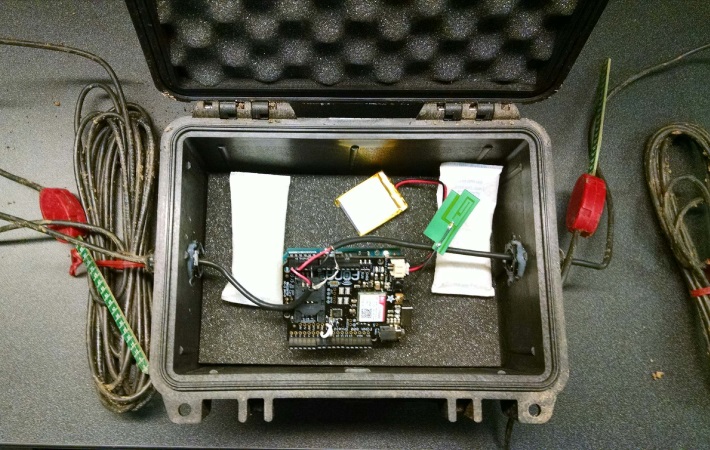
Using a handheld drill and a 1/2-inch bit, drill two holes in the Pelican case. Our version has one hole on each side of the case. Thread each sensor wire through the head of a cable gland and through the hole into the case.
Attach the two soil sensors to the Arduino. You may want to label the soil sensors using a sticker or marker; call them “1” and “2.” Each VH400 soil sensor has three wires: ground (bare), signal (black), and power (red). Connect them to the Arduino pins as such (you can press the wires into the pins with your fingers):
Soil 1 red wire > A4
Soil 1 black wire > A1
Soil 1 bare wire > GND
Soil 2 red wire > A5
Soil 2 black wire > A3
Soil 2 bare wire > GND
Once the sensor wires are securely in the pins, adjust the cable lengths in the case, tighten the cable glands, and caulk around the gland both inside and outside the case. Throw in a few dessicant packs, turn the switch on the FONA shield to “run,” and close the lid.
Did we forget to dig the hole? We forgot to dig the hole! We don’t recommend burying the Soil Cell more than a foot deep, as that degrades the network signal and makes it more difficult to dig up. The soil sensors can be installed horizontally at whatever depth you desire. Upon deployment, the unit sends 5 data points two minutes apart to test connectivity. Thereafter, readings are sent every two hours.
View the Data
Log in to Ubidots anytime you want to see the latest data. Ubidots will automatically generate a plot of your data, which you can embed on any website. You can also download text or csv files of archived data.
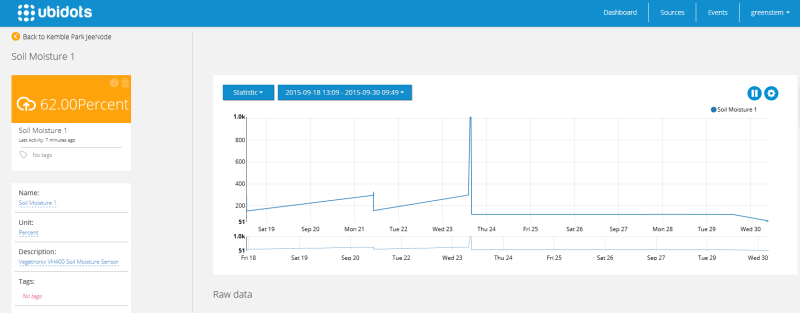
If you’d like to set up a watering alert, click on the Events tab, add an event for your source and variable, and create a rule (e.g., “If Soil Moisture 1 < 20%,” send an email). Again, Ubidots is just one possible endpoint for your data; try other cloud services, Amazon’s IoT service or configure your own server to receive the HTTP post request.
For greater accuracy, calibrate your soil sensors. We have used this procedure from Decagon in combination with the ASTM method (shortened version here) for using a microwave oven to dry the calibration samples.
Check out the updated 3G soil cell here.