25 Feb

TechCamp Philadelphia

techcampheaderWhat just happened? This weekend, the sensor project idea got picked up at a hackathon, gained a whole team of technologists, and is on its way to wirelessly transmitting data to a website with a fully functional database. My first hackathon was a blur of activity, and that’s probably an apt working definition of a hackathon. But for accuracy’s sake, here’s the background on this weekend’s event:

TechCamp is a U.S. State Department program that connects technologists (I don’t like this word, btw) to people who are trying to solve social problems. Many of the previous TechCamps took place in cities in developing countries, and as far as I’m aware this is the first domestic event. It’s a sign of the times: Co-sponsored by the School District of Philadelphia and Technically Philly, this hackathon focuses on our city’s public schools and finding ways to use technology to improve education and administration. The two-day hackathon—the part where programmers and software developers work on a project, such as a mobile app for students—was only one element of TechCamp, but it was the part that enabled the Solar Sunflower project to grow some legs.

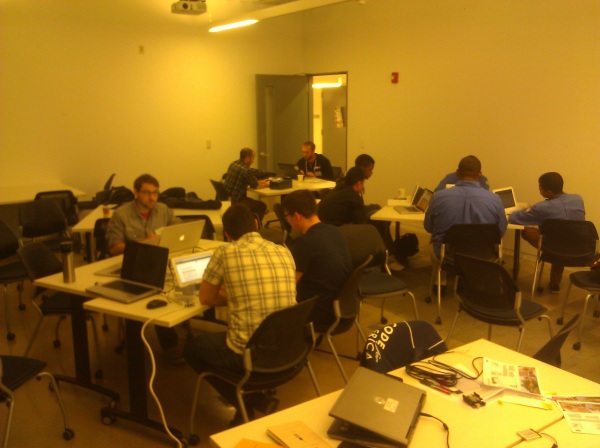
In democratic fashion, the hackathon at Drexel University’s URBN Center began with people contributing project ideas to a whiteboard; groups formed based on interest and requisite skill sets. (Special thanks to Paul Fugazzotto, from PWD public affairs, for attending the first day and helping to generate interest for the sunflower.) I was lucky to get hooked up with three really talented programmers: Christopher Nies, a Python developer; and Kevin Clough and Jason Blanchard, both of whom do development with Ruby on Rails (more on that shortly). Here’s some of our team working in the foreground this weekend:

TechCamp_hackathon

After I explained the project and gave some background information, Chris, Kevin and Jason had a plan of attack in place within minutes: We’re going to send JSON packets containing sensor data over wifi from the Arduino to a Ruby on Rails application running on Heroku. You got that, right?

Let’s try that again. The Arduino is going to hook up to a wireless network. In our case, it would be the school’s network (special thanks to School District of Philadelphia IT personnel—Melanie Harris, Phil Ichinaga, Sam Garst—for their support of the project). It’s going to send sensor values in a data structure called JSON, which stands for JavaScript Object Notation. JSON is kind of like the envelope that holds a letter: It is code that encloses the data in a simple, lightweight wrapper that is human-readable and easy to work with. Inside the JSON code you might specify the location of the sensor (site name), an ID for each sensor (soil sensor 1, soil sensor 2, etc.), the actual data value, maybe even a timestamp. The server is then configured to receive the data so it knows what to expect from the packet.

Now the most difficult part (for me, at least): Ruby on Rails. Ruby is a programming language, like Python or PHP or C++. Rails, on the other hand, requires a little more explanation. It is a web application framework that runs on Ruby. Oh right, a “web application framework.” I’m sure the finer points of Rails will reveal themselves in time, but for now I’m satisfied to know that it provides a way to build websites quickly, using less code than other approaches. (Full disclosure: Although I do consider myself a novice at programming, I have experience with HTML, CSS and other website-related things.)

Heroku is a cloud hosting platform. It’s a place to put a website. It’s free, up to a certain point of usage. This makes it a smart choice for projects under development.

Most of the progress made during the hackathon involved getting the server and website set up, programming the Arduino to talk to the server, and wiring up the sensors. Throughout, we had many people—educators, scientists, students—stop by our table to learn about the project. While I mainly preached the gospel about green infrastructure and stormwater management to our many visitors, Kevin, Chris and Jason did the heavy lifting on the tech side. Here’s a shot of our setup:

TechCamp desk

In the photo above, we have three soil moisture sensors wired to a breadboard (a plug-in board that lets you connect circuits without soldering wires) and connected to a Bluetooth shield. We ended up not using Bluetooth to transmit data; to the right of the breadboard is an Arduino and Ethernet shield that provides a better way to connect to the web. (Connecting via wifi is on the to-do list; we just wanted to test our connections to the server and Heroku site.)

Even though I arrived with a duffel bag full of electronics—Arduinos, sensors, breadboards, cables—at one point I had to steal away to Radio Shack to buy the Ethernet shield for the Arduino. It cost around $20. Now, I’ve become a semi-regular customer at various local Radio Shacks since embarking on this project, and I’ve never underestimated the base-level weirdness of the Shack’s clientele. But this time was special: A lady, perhaps thinking I worked at the store, asked me which digital converter box would scramble signals from her TV … because the people from the TV were accessing her brain and stealing her thoughts.

But I digress. Our team wasn’t able to do a live demo of the sensors transmitting data to the web, but we gave a solid closing-night presentation in front of a great audience of educators and the tech community. Best of all, the team resolved to keep working on the project, and we’ll get together at Code For Philly meetups in the future. More than anything, I was astonished at the level of interest and support for this project and hope to keep the momentum going.

18 Feb

Playing in Dirt: Soil Moisture Sensors

Resisting all impulses to make a “dry subject” joke with regard to soil moisture, let’s jump right in and look at the sensors below ground in our solar sunflower project. At this point, we’re planning to use Vegetronix VH400 soil moisture sensors (pictured below). We can’t directly measure soil moisture (well, it’s possible, but it involves disturbing the soil, drying it, and weighing it), but we can estimate the water content with dielectric sensors such as the Vegetronix.

vh400The basic idea is that wet soil conducts electricity better than dry soil. So we stick the sensor in the ground, have it emit an electromagnetic signal, and detect how well that signal is reflected back. Based on the amount of voltage detected by the sensor, it’s possible to estimate the volumetric water content (VWC) of the soil. VWC is simply the percentage of water in the soil—that is, it’s an overall percentage of water in the entire volume, which includes soil, water and air trapped between soil particles.

Of course, not all soil is the same. This complicates things—water drains through sand quickly, for example, but clay holds on to water—and can greatly affect the accuracy of the sensor readings. Calibration is the key to accurate soil data in this situation, and there’s really no way around it. The upside is that calibrating sensors (getting readings in dry soil, semi-dry soil, semi-wet soil, wet soil and constructing a curve based on those readings) is real science. It’s so real you won’t be able to stand it.

It should be mentioned that there are other ways to measure soil moisture besides the dielectric method described above. If you’re concerned about accuracy and have a lot of money, time-domain reflectometry (TDR) is for you. More realistically, for our application, you can also measure the soil tension, or how much suction is being exerted on the water in the soil. The Watermark 200ss soil moisture sensor (pictured below) measures soil tension. It contains two electrodes in a gypsum matrix. Water allows a current to move between the electrodes, and as the soil dries out, water leaves the sensor matrix and resistance between the electrodes increases.

watermarkWhy did we choose the Vegetronix over the Watermark? I see us asking that question again later on. Both sensors are affordable (a little under $40 each), which is a prime consideration here: We want to keep the cost of materials as low as possible, so that any school can obtain sensor equipment. The Watermark’s advantage is that it doesn’t care about soil type. However, it’s not great for sandy soils (such as we might find in a rain garden), and after some testing, the response time is not as fast; with the Vegetronix, you can grip it in your hand, and the sensor reacts to the moisture from your skin—it’s great for demonstration. The Watermark also takes some pre-wetting on installation and needs to be re-installed if it dries out completely. So it’s the Vegetronix for now, and the beauty of the Arduino is that we can change sensors at any time; it’s going to accommodate a wide variety of sensor types.

And now for the bad news: Soil moisture data is not inherently exciting. It is truly akin to watching paint dry—you see the volumetric water content spike during a storm or watering, then gradually decline until the next rain. So we’re going to need to make this more interesting. Adding a temperature sensor to the Arduino is easy; and we can grab rainfall and sunlight data from other websites (PAR sensors and rain gauges are a bit more difficult/expensive). Now we can correlate environmental data and see what typically happens during a storm: temperature drops, sunlight dims, rain falls, and soil moisture spikes.

The last thing I wanted to mention about these soil moisture sensors (for now) is that the sunflower will have three of them at different depths: one in the root zone, and two more beneath. We should be able to see the water infiltrate through the soil profile during a storm if we take sensor readings frequently enough. We should be able to draw some conclusions about how well the rain garden is draining. And in some cases we may want to bury the sensors at different spatial locations rather than different depths to determine, for instance, whether parts of the rain garden are receiving water and parts of it are not.

Who loves soil moisture? Australians and farmers. Read an outstanding primer on soil moisture sensors here.

15 Feb

Green Schools: Greenfield and Nebinger Elementary

greenfield_photo

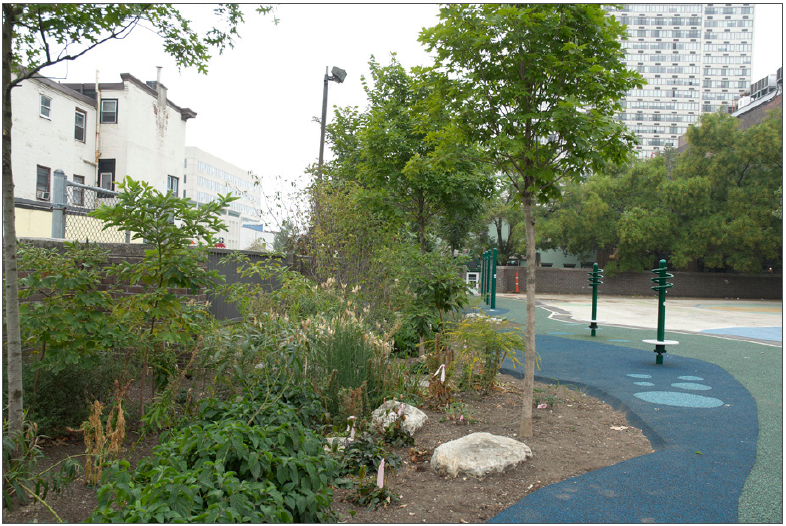
Now that we have the idea of a solar-powered, sensor-equipped sunflower that allows students to monitor plants in a rain garden, it’s time to think about where that sunflower will take root. Greenfield Elementary School in Center City has been a model of a “green school”: In 2009, the Philadelphia Water Department worked with the school’s parent group, the Philadelphia School District, the Community Design Collaborative and the EPA to transform an asphalt schoolyard/parking lot into an attractive, green playground (pictured above) that manages stormwater using rain gardens and porous play surfaces. Watch the video below for more detail:

A similar transformation is about to take place at Nebinger Elementary School in South Philadelphia (actually, Bella Vista—you can start a small war in Philly if you’re not careful about getting the neighborhood correct). This summer, construction begins at Nebinger to create a rain garden and porous play surface where asphalt used to be. The rendering below shows what the greened schoolyard might look like. The rendering below also shows what it might look like if a child with one foot were running—you see that guy in the background?

OLYMPUS DIGITAL CAMERA

Schools are great locations for green infrastructure. Blacktop schoolyards tend to be large impervious spaces that normally contribute a large volume of stormwater to the sewer system. Schoolyard makeovers can revitalize play areas and introduce nature to the urban landscape. Having the students use technology to monitor their vegetation adds another layer of connectivity and offers even more opportunity for STEM education.

11 Feb

Solar Sunflower Sensor

sunflower_full   
Until now, we’ve been fairly vague about labeling this “Arduino project” or “GSI sensor project.” Truth is, we didn’t have a concrete idea of what a final product might look like, or even all the things it might do. Jason Cruz, an aquatic biologist at PWD, used Sketchup to create a schematic of a sunflower-shaped soil-moisture sensor (that’s a lot of alliteration). The image above shows the basic structure—a smart and fitting design that places three soil moisture sensors underground at increasing depths, much like the roots of a plant. (We’ll discuss soil moisture sensors in more detail at some point, but the ones pictured here are Vegetronix probes.)

sunflower roots

The wires from the moisture sensors run up through the stalk/conduit to the head of the sunflower, a repurposed mixing bowl or lamp head that will house the electronics (Arduino, battery, maybe a WiFi or radio device to transmit the data). This housing would be waterproofed, of course, inside a plastic case.

sunflower_head

Ideally, we’d be able to run the entire thing off solar power. A solar panel could charge a Lithium-ion battery (a setup similar to this one, but sized appropriately for our voltage needs), and if the head of the sunflower could swivel, we could optimize exposure to sunlight.

sunflower head

Jason’s design set off a host of new ideas and transformed an electronics project into an art project. Picture the sunflower in a rain garden at an elementary school, where students can use it to monitor soil moisture and water their plants when the soil is too dry. What if there was a do-it-yourself sunflower kit that students can build, decorate, and install themselves? What about a student design competition for the sensor housing? The Solar Sunflower would be a powerful tool for both GSI monitoring and STEM (science, technology, engineering, math) education.

04 Feb

Hello, Arduino

arduino

It’s pronounced “Ar-DWEEN-oh.” It’s Italian for “$25 Radio Shack computer.” (Not really.) But it is made in Italy, the basic model costs about the same as a decent haircut, and it is a deceptively powerful microcontroller board that fits in the palm of your hand. Learn more about it here. Attach some sensors to the Arduino and program it to take temperature, humidity, or soil moisture readings. Modify the Arduino (using snap-on components called shields) to send that environmental data to a website, post it on Twitter, or text it to your phone. There is a huge community of Arduino hobbyists—regular people who use these things to water houseplants, open a chicken coop door, or create a laser harp. (OK, that last guy may not be a regular person.) Point is, there are many jumping-off points for people who have never programmed a computer before; the code is “open source,” meaning it is free for users to modify as they see fit; and it is getting easier for beginners to do inexpensive, custom electronics projects.

What does this have to do with monitoring rain gardens, maintaining healthy trees, and all that stuff in the previous post? The Arduino provides a cost-effective way to start exploring how we can monitor our green stormwater infrastructure projects. It’s also a great teaching tool—it’s becoming more and more common for engineering students to use an Arduino in a freshman-year design lab. We’re just about starting from scratch. I’m not an electrician or a computer programmer; I’m an environmental engineer whose day-to-day work involves water quality in rivers and streams.

That said, I don’t mean to lead anyone down the primrose path and insinuate that the Arduino can be plugged in and instantly operated with a few mouse clicks. There is a learning curve. There is a seemingly arcane vocabulary associated with it: pins, shields, code libraries, the Uno, the Leonardo, the IDE and the ADCs. To that end, there are both print and online resources available to help you get started. The following is not an endorsement of any particular book or website—these just happen to be the ones I relied on to get started learning about Arduino.

The book Beginning Arduino by Michael McRoberts is a good kickstart. To be honest, I didn’t go much beyond the first two chapters because the rest of the book steps you through specific projects. I had my own agenda and sensors that I wanted to experiment with. The website Adafruit sells Arduino and related products (sensors, battery packs, etc.), and also features excellent tutorials on how to use them. SparkFun also stands tall among online stores, and its tutorials focus on the basics of electronics (voltage, resistors, analog vs. digital) for those who need more background. Shop around for the best prices. There are many online forums dedicated to Arduino projects and troubleshooting, but they can be daunting. To jump right in with a project, check out Instructables or Make for step-by-step tutorials with photos.

01 Feb

The Big Green Problem Statement

Philadelphia has a problem—well, it has many problems, but one particular issue drives this project and steers the course of its development. Before we begin our story about a solar-powered sunflower, STEM education, civic hacking, soil sensors, and the strange people you meet at Radio Shack, we’d be remiss not to paint the background for all our efforts.

Like many older American cities, Philadelphia mostly has a combined sewer system. The unfortunate byproduct of this system is that, when it rains, the volume of combined stormwater and sewage in the pipes is too great for water treatment plants to handle. The result is an overflow into our rivers and streams, and a negative impact on water quality and aquatic life. The Philadelphia Water Department’s solution to this complex environmental problem is Green City, Clean Waters, a 25-year plan to reduce combined sewer overflows and improve our waterways by implementing green stormwater infrastructure.

Simply put, green stormwater infrastructure (GSI for short) mimics the natural process of plants and soil absorbing water. Instead of allowing stormwater runoff to enter the sewer system and cause overflows, GSI tools (such as rain gardens, planters, green roofs, porous pavement and tree trenches) capture that water and allow it to soak into the ground. It’s more cost-effective than building a giant underground storage tank. It makes the city a greener place. It’s innovative, and it is happening on a massive scale. This is a snapshot of our Big Green Map—a depiction of the GSI projects currently completed or in design; there will be hundreds (maybe thousands) of more dots on this map in the decades to come:


How will the Water Department monitor these GSI projects to make sure they’re working? How do we maintain them so the plants don’t die? How do we engage and educate Philadelphians to take part in this massive greening of the city?

It’s the 21st century. We’re going to use technology. We’re going to partner with creative and talented people who want to help, and we’re going to share our work—mistakes and all—with the world.